The Fundamentals of Belts and Sheaves
By Stan Riddle, Acoem USA Technical Training Supervisor
In some industries, like oiling, drive belt replacement is considered a task for the new guys on the floor. It’s an easy job right? Absolutely. But there are many ways to do it incorrectly if not taught properly the first time. First, let’s talk about the two most common types of belts, V-Belts and Synchronous Belts.
V-Belts
The oldest and most commonly used power transmission belt style in the industry are v-belts, which is why they are sometimes referred to as “classical” belts. It drives through frictional contact between the sides of the belt and the sheave groove surfaces. Typically, the v-belt does not make contact with the bottom of the sheave groove.
Synchronous Belts
Also called a timing belt, a synchronous belt is a toothed belt which drives through positive engagement between the belt teeth and mating grooves in the pulley. Instead of making contact through friction like a v-belt, this positive engagement allows the shaft to synchronize and eliminate slippage and variations in speed. When dealing with belts there are 3 main factors in proper maintenance; tension, installation, and storage.
V-Belt Tensioning
Proper belt tension is critical when installing a belt as it ensures long satisfactory operation and determines how long the belt will actually last. Here are potential problems you might encounter with improper belt tensioning:
If a belt has too little tension, it results in a multitude of ways including, slippage, excess heat, and premature belt and pulley wear. The excess heat can also affect bearing life.
If a belt has too much tension, it results in excessive stress on belts, bearings and shafts.
Have you ever seen someone in your workplace pluck a belt or touch it and claim they’ve just checked the tension? After 20 years of knowing a machine, some might feel confident enough to do that. However, it’s not the proper way. Not all belts feel the same when they are properly tensioned due to different tension cables or materials used in their manufacturing process*.
A belt will still operate satisfactorily within a wide range of tension. The importance is to find the proper range for any V-Belt drive. To check the tension of a v-belt, use a tensioning gauge in unison with a belt deflection table. Want to know how to do this? Watch the video to learn how.
V-Belt Installation
During installation, if the belt is rolled onto a drive, this will loosen and damage the belt and shorten its life. Prying a belt damages cables in the belt which will eventually lead to early belt failure. If a belt isn’t properly installed, it will greatly affect the belt life and lead to additional problems elsewhere.
To properly install v-belts, loosen the motor-mount bolts, move the motor forward, and slip the belts over the sheave without forcing it on. Once again, do not pry or force the belt onto the sheave, loosely put it in place.
After this, make sure that both belts have slack on the top side of the drive. Tighten the belt to the correct tension and run the unit to permit them to set in the grooves. Stop the machine and retighten the belts to the correct tension. Finally, recheck the tension of the belts after 24 to 48 hours of operation.
Belt Storage and Achieving Optimal Shelf Life
If your belt is hanging off a nail on your warehouse walls, you’re already damaging your belt. Unfavorable conditions can poorly affect the performance of your belt and cause dimensional change.
Following these 5 steps will help to preserve the quality of your belts:
- Keep belts flat. Preferably in a box. However, do not stack boxes too high to avoid adding unnecessary weight to the bottom box holding the stack of belts.
- Hanging belts on larger shapes. Hanging belts should be a last resort, but if you need to do so because of space issues, please never hang your belts over nails or similarly small shapes. We recommend a larger crescent shape peg, PVC pipes cut to length make a great solution.
- Coil longer v-belts. To do this, may be coil the v-belts in loops for deformation-free storage. This prevents them from forming a lump from being hung. The lump that forms will prevent the belt from properly performing.
- Avoid floors. Unless a belt is in an acceptable box that will protect it, keep belts off of floors. They could otherwise gather moisture or be trampled in high traffic areas.
- Store away from windows/heat. Too much sunlight could damage belts. Additionally, moisture could get in if windows aren’t properly closed. Keep away from radiators or heaters, as heat will dry out the oils found in belts.
Sheave Alignment
The last factor in belt maintenance we want to cover is sheave alignment. Even if a V-Belt is properly installed, an improperly aligned sheave could still cause unnecessary wear and tear. Proper sheave alignment is critical to trouble-free operation of V-belts. Just like a machine shaft, sheave misalignment comes in three forms: Angular, Parallel, and Sheave Groove. We will cover this more in depth in a future blog post.
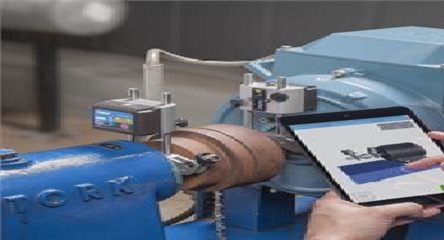
Sheave alignment has traditionally been done with a straightedge or string. However, there is a more accurate way to do it with lasers. That’s why we created the Belt Hog. The VibrAlign Belt Hog uses the pulley groove as the reference, allowing you to achieve a precise belt alignment which reduces wear, bearing failures, and vibrations. Check out the Belt Hog here.
Misaligned sheaves causes:
- Decreased belt life
- Increased vibration and noise
- Increased heat
- Excessive loading of bearings
- Decreased sheave life


What is the Best material for sheaves?