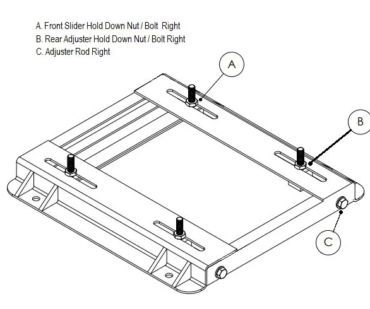
Adjustable motor bases and rails are available in a variety of sizes that accommodate most motors. These bases are an easy and great solution as they simplify installation and offer adjustments for alignment and tensioning.
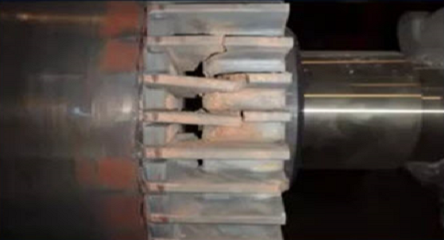
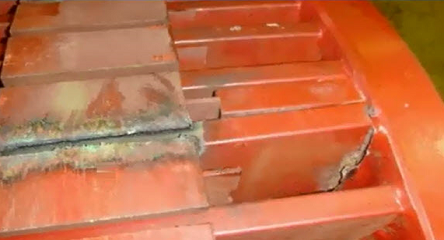
Adjustable motor bases are very real problems for maintenance and mechanical professionals. The base becomes impossible to adjust, nuts freeze up, bolts seize, rails crack and ultimately the base completely fails.
Belt installation is often done improperly because the base bolts are bent, locked, and seized, they cannot be loosened, and the motor can’t be moved. As a result, the belts are rolled on to the pulley!
This also impacts reliability because belts are left misaligned, mounting bolts are loose, metal fatigue results, and the motor and driven equipment vibrate excessively.
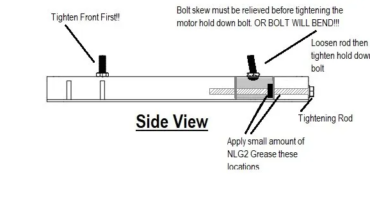
The most common reason for seized or frozen bolts, fatigue cracks, and broken a motor base is, improper adjusting and tightening of the motor. If this procedure is not followed the motor mounting bolts will bend when tightened! Once bent these bolts lose tension and will ultimately fail.
Here are a few tips on how you can make your motor bases more reliable and stand the test of time.
Adjustable and slide motor base tensioning procedure.
1. Make sure the base and slide rails are clean and free of debris.
2. Make sure the base rails are flat to each other. Use the B.A.T. Belt Alignment Tool with disc targets to check flatness.
3. Lubricate the tensioning rods with a small amount of grease. This will reduce friction on the tensioning nut that holds the motor hold down bolt.
4. Set the motor.
5. Install the nuts on all 4 motor hold down bolts loosely. This is critical and will allow the motor to slide easily without damaging the hold-down bolt threads.
6. Begin to tension the belts by alternating the turning of the tensioning rods left to right.
7. Observe the belt tension and adjust to the recommended tension.
8. Tighten the FRONT motor hold Down nuts FIRST! Alternate tightening left to right.
9. Stop tightening the FRONT nuts when they are tight enough to prevent sliding of the motor.
10. Ease and loosen the tensioning rods on the back feet of the motor. There should be enough torque on the front bolts to prevent the motor from being pulled forward by the belt tension.
11. The rear tensioning bolts should be loose and have clearance in the motor foot bores.
12. Tighten the rear motor feet hold down bolts, alternating left to right.
13. Tighten the nuts enough to prevent the motor from moving.
a. This procedure has pulled the motor down to the base and has trued the bolts in the motor foot bores. As the motor is pulled down, the belt tension increases slightly.
b. Recheck the belt tension again and re-adjust the motor by slightly tightening the adjusting rods, loosening the hold-down bolts, and repeating steps 6 through 13.
14. Check alignment with the B.A.T. Belt Alignment Tool and adjust as needed.
15. Confirm proper tension.
16. Tighten the nuts as described in step 8-12 to the specified torque using a torque wrench.